Outbound Domaining Breakthrough Part 3
Here I will talk more about the “product” your prospects will receive over many individual emails as well as some managing details.
Regardless of whether or not your prospect actually reads the emails or puts the system into action for themselves is mostly irrelevant.
You’ve fulfilled your promise by providing a rock solid time-tested method for any local business to increase their business traffic and attract new customers on a regular basis, with no cost or ongoing effort.
As a domainer, the only thing YOU want out of this is for your prospects to be curious enough to look at your signature link which offers your highly relevant domain for sale.
They will notice this in every single email you send them. Multiple exposures means a much higher chance of an eventual sale. They say it often takes at least 7 or 10 exposures to something before a prospect pays attention to it. So the ODB system is designed to do just that.
The beautiful part about the ODB system is it removes all the fear of rejection for you. You’re not asking for a sale at all. You’re simply handing out REAL value for free, no matter if they eventually buy something or not.
Also, it’s SO simple to do because you can virtually send the exact same email message to every prospect in every niche and campaign.
That being said, I do like to customize the message for a particular campaign with the mention of the niche. If you look back on my example email (just the first one), you’ll notice I included the niche word in a few spots. It’s optional but takes very little effort. It does make the prospect relate to the message better.
Organizing Your Email Campaigns
I want to keep this as easy as possible for you. Using this method means you only have to spend about 5 minutes per campaign each day. If you have 3 campaigns running, that’s still only 15 minutes or so per day.
Each “campaign” simply means having an organized email list to send to. That could be 3 or 4 emails, or 10, or 25, or 100 or more. It all depends on how many prospects you are able to round up.
Once you’ve made a list of prospects with email addresses for a particular campaign I’ll discuss how to find those later), it’s a simple matter of pasting them into a spreadsheet.
Each spreadsheet will be a different campaign for easy management of daily mailings. You only have to set up a spreadsheet once per campaign.
I prefer to use Excel, but you can use ANY spreadsheet software you have. You can use Google “sheets” if you’d like, which is free to use.
The Spreadsheet
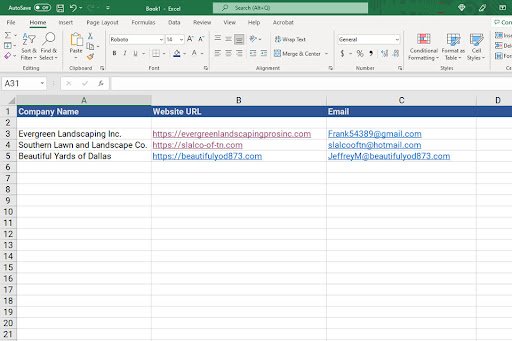
Nothing complicated at all here. All you’re going to do is copy the relevant information about each prospect and paste it into the spreadsheet.
That could be simply the Business Name, their Website URL, and their email address.
Or, if you have more information available on your prospects, it would be good to include as much as makes sense so you have a clear view of who you’re dealing with. That could include the owner’s first name, phone number, street address, FaceBook page, Twitter, and anything else you know.
Simply make a column in the spreadsheet for each type of information. Here is just an example:

Once you’ve created a spreadsheet for a single campaign, you’ll simply open that once a day to copy the list of email addresses.
Then you’ll open your email sending account and paste the list of emails into the BCC section (Blind Carbon Copy). That will let you send that single email to all recipients in that campaign, but none of them will be able to see the other recipients.
On a daily basis, you’re going to have to watch for prospects’ requests to REMOVE them from your prospect list. It is IMPORTANT that you comply with their request or you’ll be in violation of email regulations.
Simply delete their row in the spreadsheet and re-save the spreadsheet for the next day’s use.
I like to copy & paste all removal requests into a separate spreadsheet just to keep on file for my own records. That makes is easy to look back on them and to be able to check them to avoid using them in future campaigns.
In Part 4, I will give you the full set of emails that complete the whole campaign from start to finish.
Proceed to Part 4
Viewing Part 3 Now
